

![]()

![]()
 Step #1
Choose the fin edges filter (Filter>Stylize>FindEdges). Now your picture should look like that:
 Step #2
Duplicate the image you got (Image>Duplicate) because we are going to use it later on.
To create the drooling ooz we will use wind filter. To use that filter, the text must be white on black, and NOT black on
white. So invert the image (Image>Map>Invert):
 Step #3
We are going to use the wind effect now. But we need to make the ooz drool down, not to the side. So rotate your image
90° counter clockwise (Image>Rotate>90°CCW). Now use the wind effect (Filter>Sylize>Wind). Choose the Right
direction and the Wind method. Repeat that to make the drooling longer (Filter>Wind). Now rotate youe image back
(Image>Rotate>90°CW). Now you got a picture of text drooling down like this:
 Step #4
Remember the duplication we made at step #3? We are going to use it. go back to the original image and selcet all of it
(Select>All). Now copy it (Edit>Copy). Go back to the drooling image and craete a new channel: Select the Channels tab
on the Layers/Channels/Paths window. Click on the little white paper on the bottom of that window. In the dialog box
make sure that color indicate masked area and click OK. Now paste the selection into that channel (Edit>Paste). Select
the original channel (probably named Index) and choose the select menu. Go to the Load Selection. Make sure that
you are using the same document and that the channel is cannel #2. Also make sure that the operation is New Selection.
Click OK. Now, all the things beside the text is a selection and any filter we will aplly to the image will affect the droolig
ooz only.
The ooz is to sharp and clean. so blur it! use Gausian Blur (Filter>Blur>Gausian Blur) to blur the ooz. Use a radius that will make the ooz look a bit more soft but still druling down on straight lines. (I used a radius of 1). Now we got a soft ooz that drool straight down. We need to make it's path more like a slalum. To do that ripple the image (Filter>Distort>Ripple). Choose setting that are aprropriate for your image. A medium size and an amount of 80 will do job just fine for images at the same size like mine. now your image look like this:
 Step #5
You can deselct the image now, we don't need it anymore (Select>None).
To create the radioactive affect, we need to colorize the image at an indexed color mode Convert the image to indexed color mode (Mode>Indexed Color). To colorize the image go to the Mode menu and choose Color Table. The colors we want is the acid greens. Click and drag from the top left square to the middle of the color table. Release the mouse. Now we can change our colors. We want the first color to be black as before so click on OK. The final color for the set we pick is supposed to be acid green, so choose that color. Click on Ok. Now we got a nice range of color from black to green. Now click and drag from the last green square the the right bottom square. The first color for that range is green, so click on OK. The last one is the text color, so choose something between the green and yellow - a sick shade of green. Click on OK. Now the whole table is colored. Click on Ok and your image suppose to look like this:
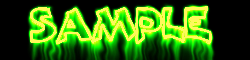 Step #6 - final result